How to Build a Lookup Page from an Excel Spreadsheet
Share results safely
Let each respondent look up their own result
Create a controlled lookup workflow for exams, race results, course records, or private respondent data.
You have an Excel spreadsheet. Hundreds of rows. Each row belongs to a different person — an exam score, a competition ranking, a training result, an HR record. And now they’re asking for their data.
You send one reply. Then another. Then ten more. At some point you paste the spreadsheet into an email with a note: “Find your row.” The spreadsheet has everyone’s data in it. You know this isn’t right. But what else can you do?
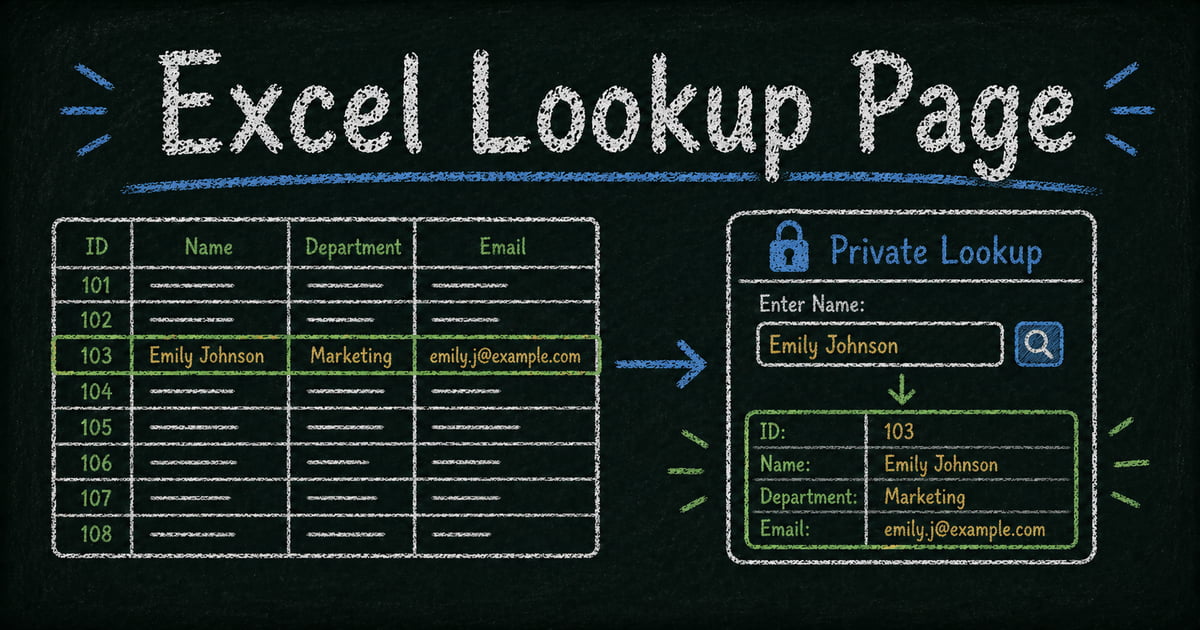
The answer: turn the spreadsheet into a self-service lookup page. Each person visits a URL, enters their ID, and sees only their own row. Nothing else is visible. No account required. No spreadsheet attached to an email chain.
A lookup page from an Excel file is a web page where each person enters their own unique ID and retrieves only their matching row — without being able to see anyone else’s data.
The fastest way to build a lookup page from an Excel file is to import the spreadsheet into a no-code tool that supports public record queries, set one or two columns as the search key, then share the generated URL. The setup takes under fifteen minutes and requires no database or code.
TL;DR — A lookup page turns an Excel spreadsheet into a private self-service search page where each visitor retrieves only their own row.
- Use a unique lookup key — registration IDs, student IDs, employee numbers, and bib numbers work better than names.
- Show only selected columns — visitors cannot browse or download the original spreadsheet.
- Prepare the file first — clean headers, remove merged cells, and save a supported Excel or CSV file.
- Works for: exam scores, race results, training records, HR records, registration confirmations, competition rankings.
- Use two lookup fields for sensitive results where guessing one identifier would be too easy.
Why the common approaches fall short
When people first hit this problem, they try one of five things. Each has a specific flaw.
Google Sheets (VLOOKUP + share link) — Even set to view-only, every visitor can see every row. Filter Views are a display-layer trick — they change what you see, not what the data exposes. Anyone who opens your sheet can scroll past their own row and read everyone else’s.
Excel Online + OneDrive — Same problem. An OneDrive share link exposes the entire workbook. There is no built-in mechanism to show each visitor only their matching row. You’re trusting people not to scroll.
Export to HTML — A static HTML page has no query logic. All the data is written directly into the page source. Anyone who views the page source or uses browser dev tools sees every record. This is worse than a shared spreadsheet.
Power BI — Requires a Microsoft 365 subscription with the right license tier, a meaningful learning curve, and doesn’t support anonymous external visitors without additional configuration. Not practical for sharing results with people outside your organization.
SharePoint — Requires organizational accounts. External people need to be explicitly invited, which triggers an account creation flow. There is no anonymous self-service lookup for people who aren’t part of your Microsoft tenant.
The core problem none of these solves: showing each visitor only their own row, without requiring a login, at zero engineering cost.
That’s what FormHug’s Public Query feature is designed for. No code. No database. Visitors need no account. Data is retrievable only by someone who knows the right search key — it can’t be browsed or downloaded. The same feature can also turn FormHug form submissions into a lookup page, so teams can publish searchable records from either a live form or an imported spreadsheet. For the product overview, see FormHug’s Public Query page.
What a lookup page does differently
A lookup page flips the model. Instead of sharing the spreadsheet (and hoping people only look at their row), you share a URL that accepts a query.
The visitor enters their identifier — participant ID, email, registration number, whatever column you designate. The page returns exactly one matching record. If nothing matches, nothing is returned. The visitor cannot see other rows, cannot export the data, cannot browse.
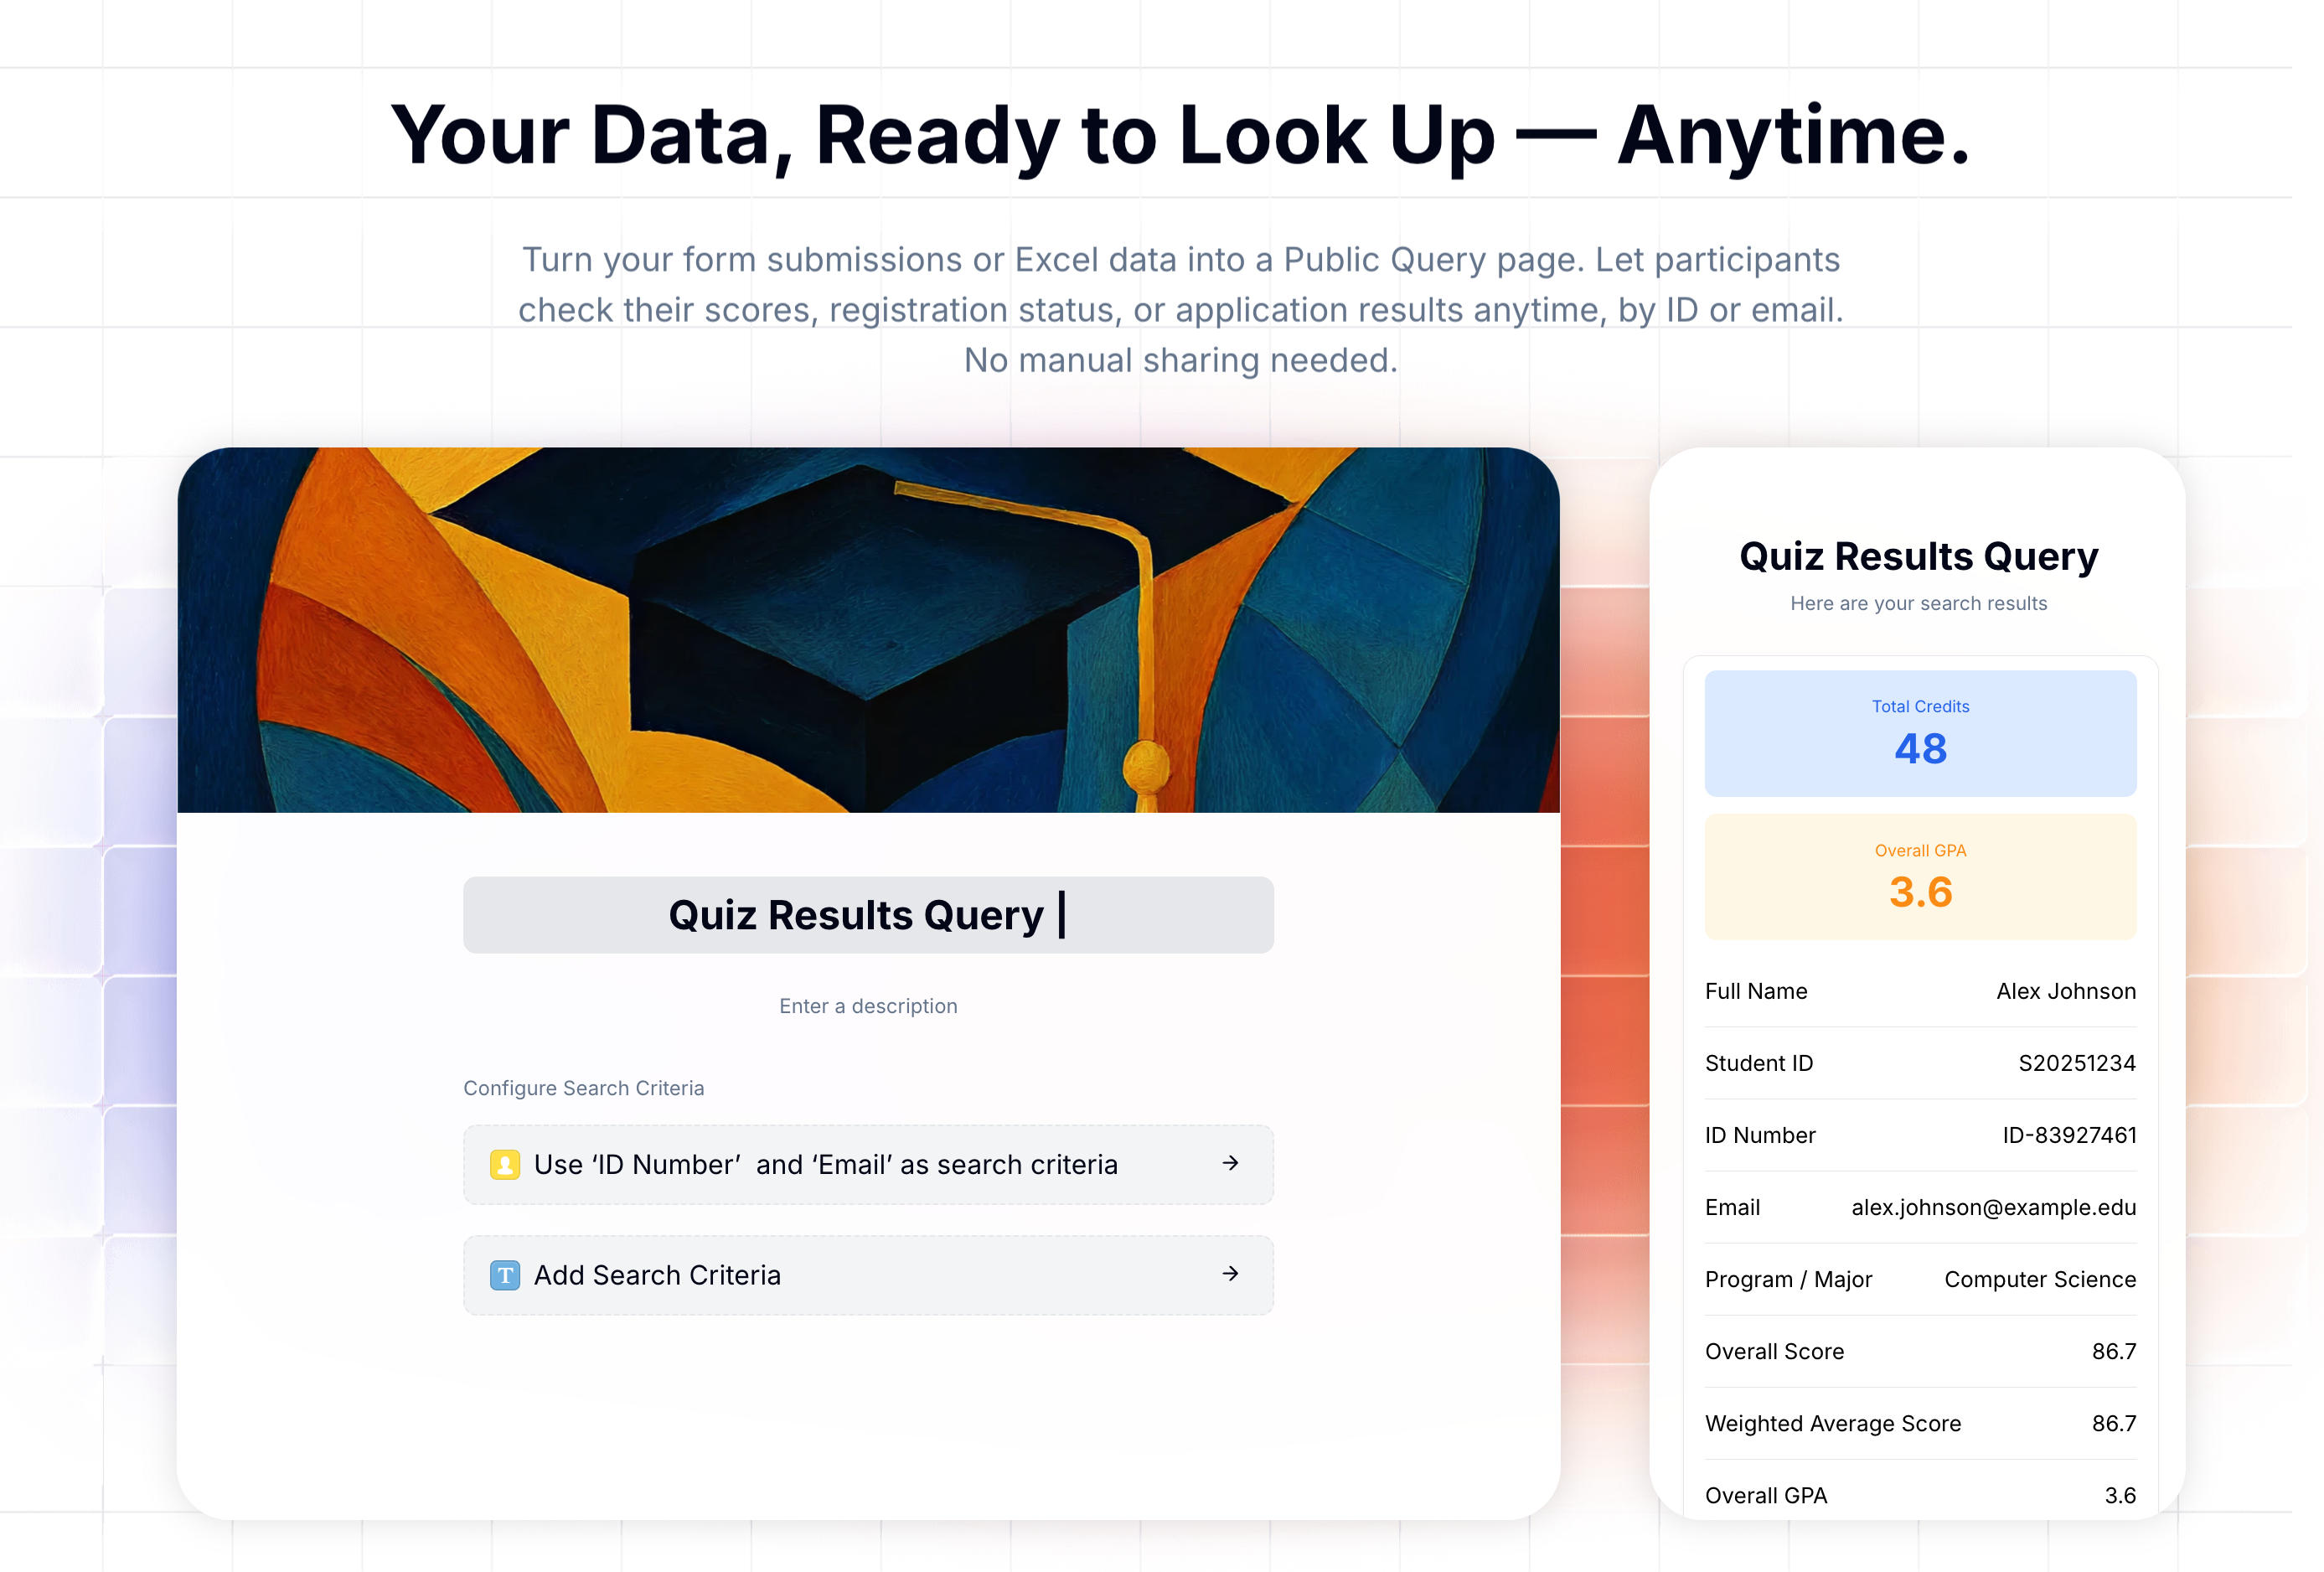 A lookup page built with FormHug Public Query. The visitor searches by ID and sees only their matching record.
You control three things: which column is the search key, which columns appear in the result, and whether any sensitive fields get partially masked. The URL is public, but the data is protected by the query key — it can’t be accessed without knowing the right value.
Before you import: prepare your spreadsheet
What your spreadsheet needs
FormHug accepts .xls, .xlsx, and .csv files up to 5 MB, 6,000 rows, and 100 columns. Before importing, make sure your file meets a few requirements:
- Row 1 must be a header row — each column needs a label. The importer uses these as field names.
- At least one column must have a unique value per person — an ID, email address, or registration number. This becomes your search key.
- Column names should be clear and simple — avoid special characters, symbols, or very long labels. These become visible field names on the result page.
What to do if your data isn’t clean
Merged cells — The importer doesn’t support merged cells. In Excel, select all cells (Ctrl+A), go to Format Cells → Alignment → uncheck “Merge cells”. Fill in any gaps left by the unmerge.
No unique ID column — If you don’t have a column with one unique value per person, add one. Use a simple prefix-plus-number scheme: REG-001, REG-002, etc. Paste the IDs into your spreadsheet, then include them in whatever you send participants (a confirmation email, a ticket, a notification).
Multiple sheets — The importer takes one sheet. Copy all relevant data into a single sheet before uploading. If you have data across multiple sheets, you’ll need to consolidate first.
File too large — If your file exceeds 5 MB or 6,000 rows, split it. You can create multiple Public Query pages and route participants to the right one (e.g., by region or batch).
How to build the lookup page: four steps
Step 1: Import your Excel file
From the FormHug dashboard, create a new Public Query and choose “Import from Excel.” Upload your .xls or .xlsx file. FormHug previews the data and lets you assign a data type to each column — name, number, short text, date, etc.
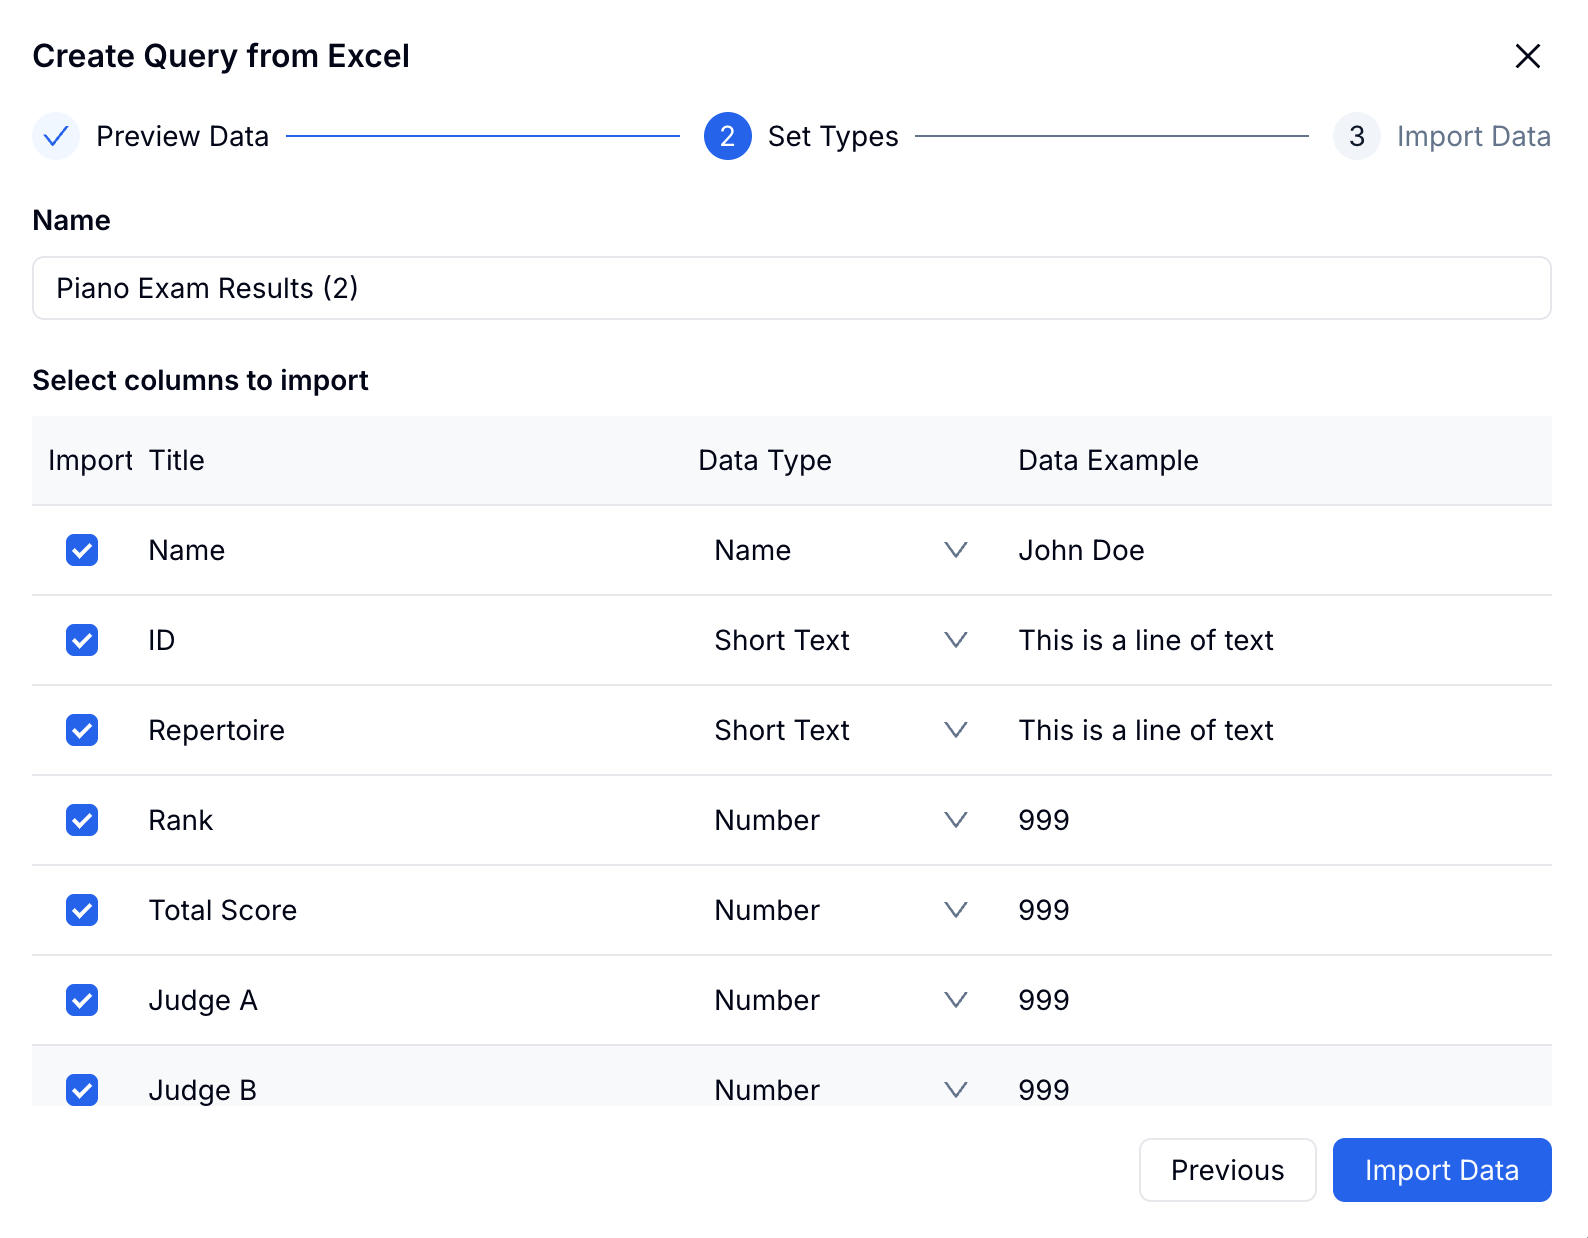 Assign a data type to each column. The preview shows your data before you confirm the import.
Confirm the import. Your spreadsheet data is now inside FormHug and ready for querying.
Step 2: Choose your lookup field
Pick which column (or columns) a visitor must enter to retrieve their record.
For lower-sensitivity data — competition rankings, training scores, event registrations — one field is usually enough. Use the unique ID column.
For higher-sensitivity data — exam scores, HR records, financial data — require two fields. Combining a participant ID with a phone number or date of birth makes guessing essentially impossible.
Avoid using first name or last name alone as a search key. Names are not unique. Multiple participants may share a name, and the right match isn’t guaranteed.
 Choose one or two fields as the search key. Two-field lookup significantly raises the privacy bar.
Step 3: Choose which columns to display
Select which fields appear in the result. Any column you don’t include is never exposed — not in the page source, not in the response.
Each included field has three options:
- Field Highlight — Pins the field to the top with large colored text. Use this for the most important value: a rank, a total score, a pass/fail status.
- Privacy Protection — Partially masks the value. “Emmerson” shows as “Emm*****son” — recognizable to the owner, opaque to anyone else who might be looking over their shoulder.
- Allow editing — Lets the visitor update that field from the result page. Useful for confirming attendance or correcting a contact detail.
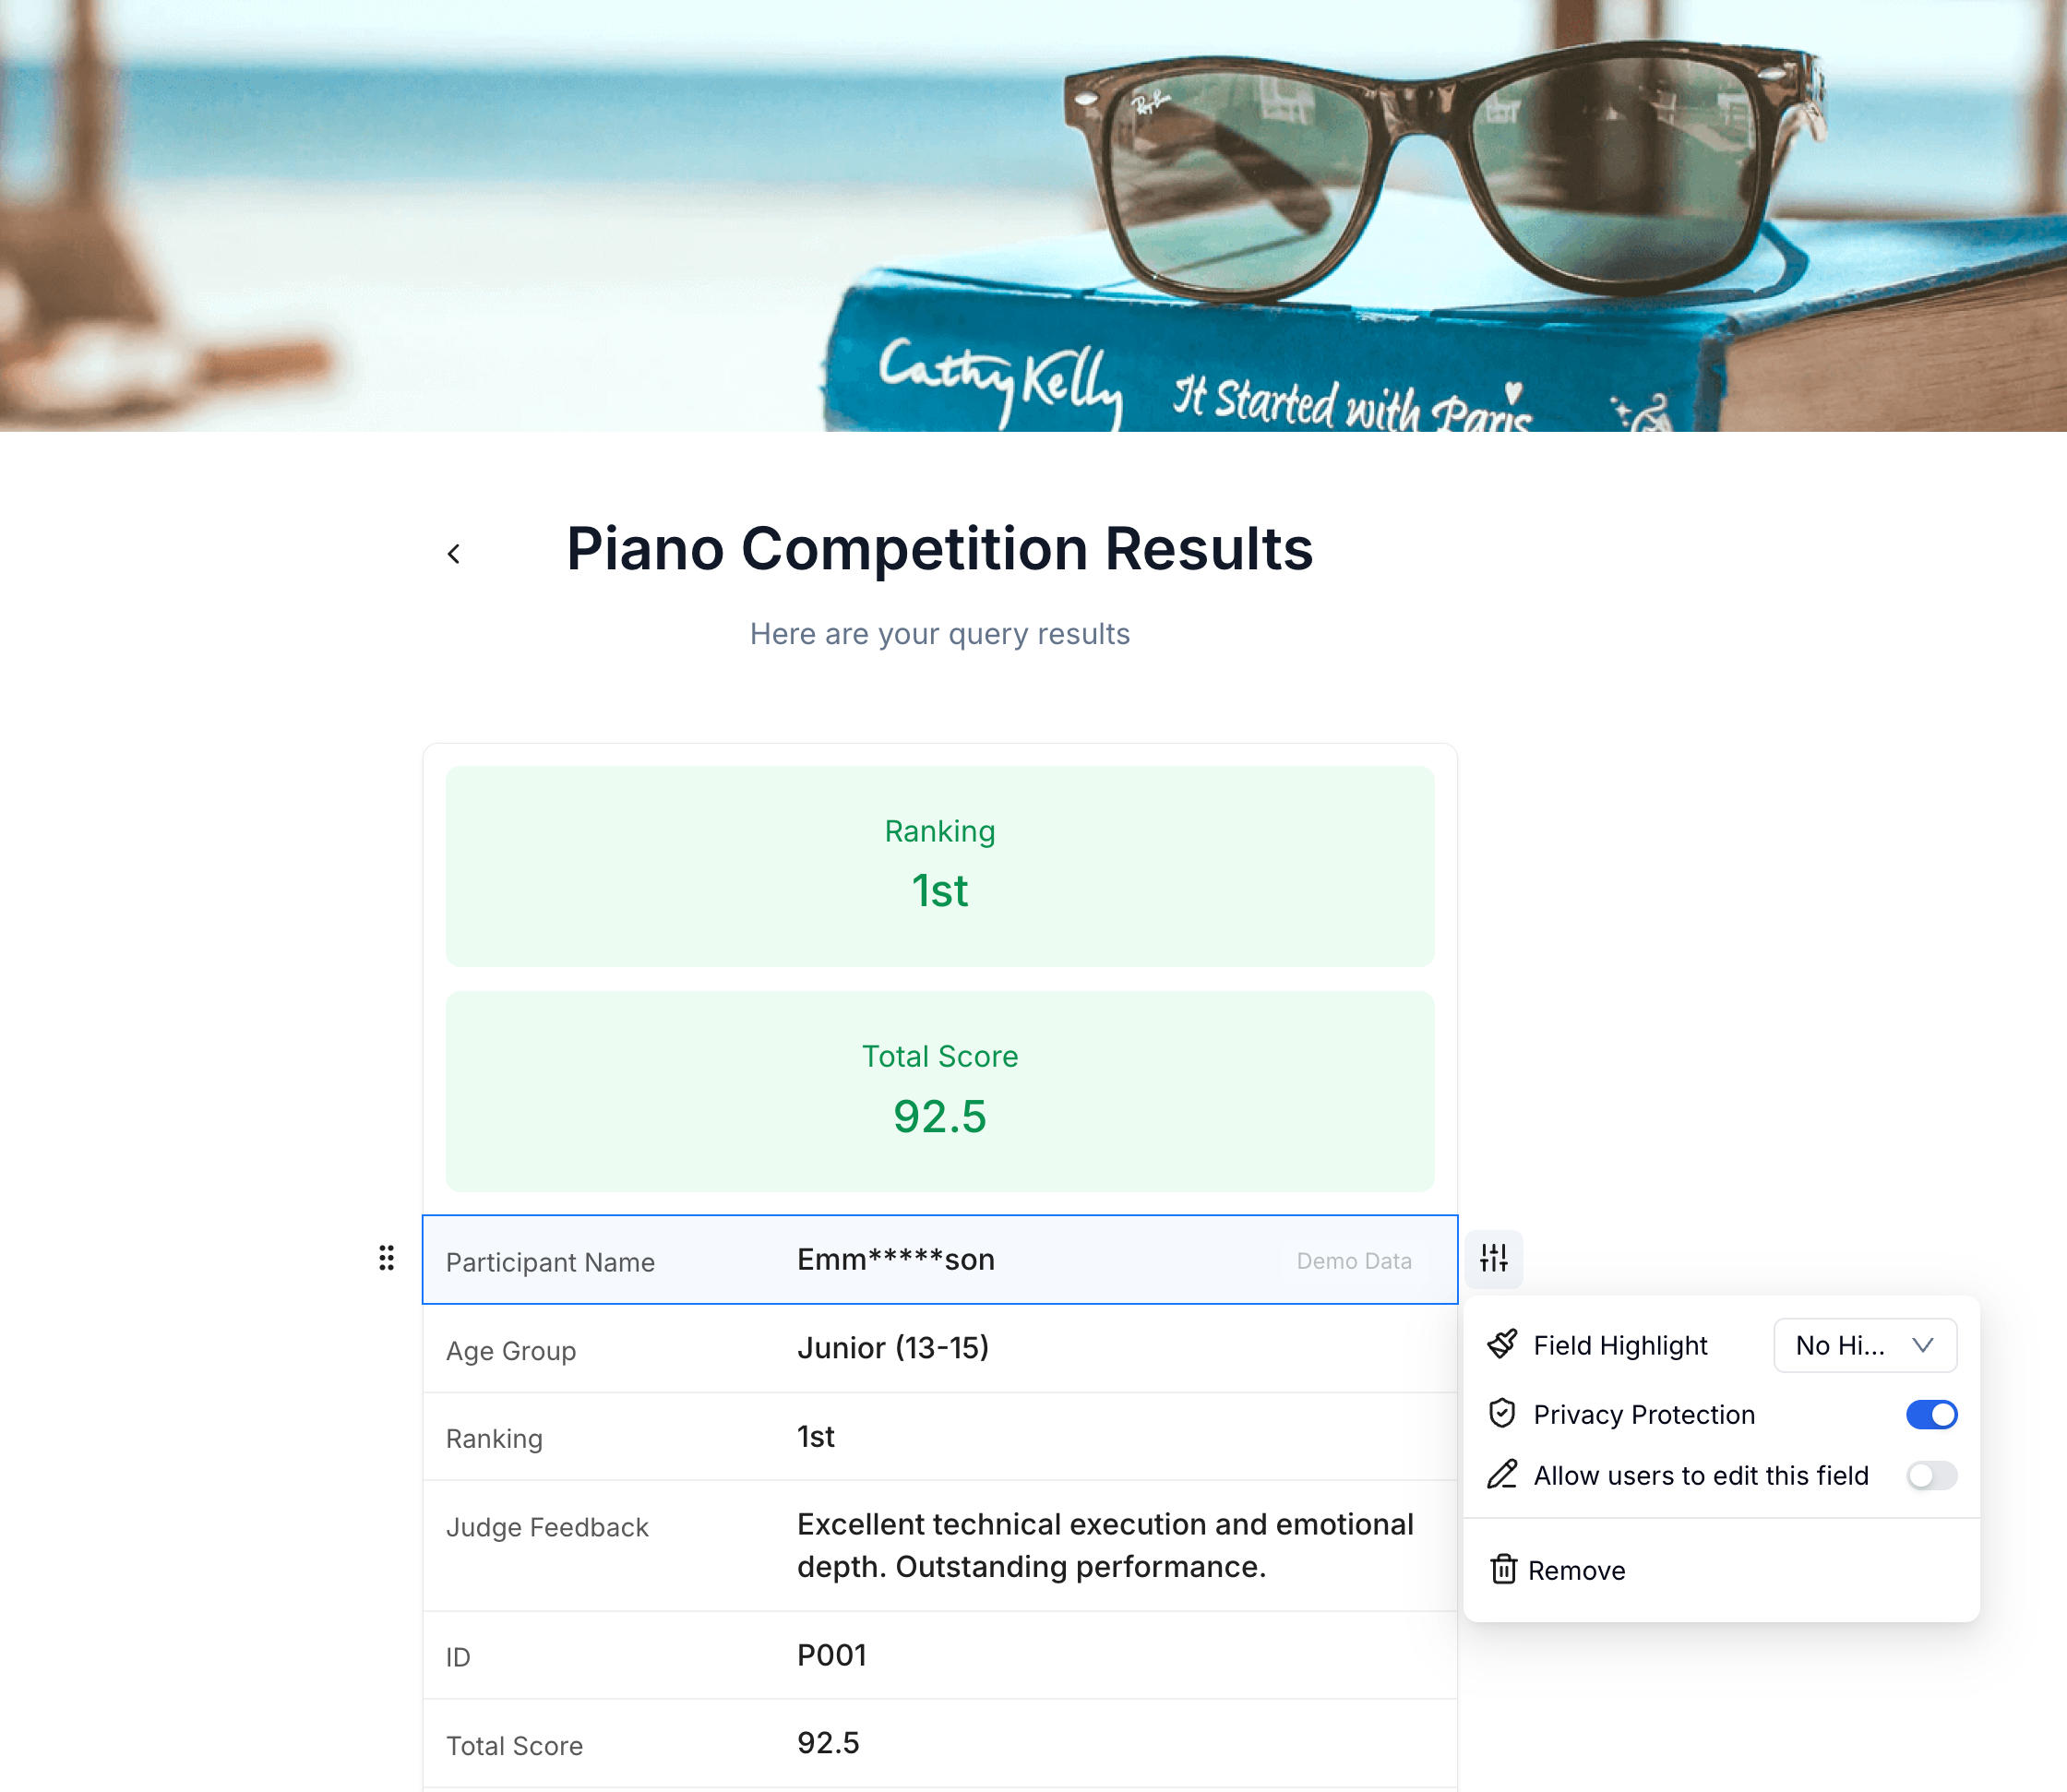 Configure each field independently. Columns not selected here are never shown to visitors.
Step 4: Publish and share the URL
Publish the page. FormHug generates a unique URL — something like formhug.ai/os/EOGiNy. Copy it.
Send the URL to your participants through whatever channel works: email, SMS, Slack, a class announcement, a results notification. Anyone with the link can look up their record. No account, no app to install.
You’ve created a lookup page directly from your Excel file. If you need to take it down after a certain date, unpublish it from the dashboard.
For the exact Public Query setup controls, including search conditions and result display settings, see the Public Query docs.
What kinds of Excel data work well for this
Competition and race results — Participants enter their ID and see their ranking, time, and score. The lookup page handles both small local events and large tournaments. See: How to Share Race Results With Participants After a 5K, 10K, or Triathlon
Exam scores and training results — Students look up their score by student ID, or by ID plus a second field for added privacy. See: How to Share Training Course Results With Students Without a Student Portal and How to Create a Private Exam Results Lookup Page
HR data — Payslips, leave balances, performance ratings. Employees enter their employee ID to see their own record. Particularly useful for organizations without a dedicated HR portal or self-service data portal.
Customer and member records — Order status, subscription details, membership tier. A lookup page covers the basic “check my record” use case without building a customer account system.
Scholarship and application outcomes — Applicants enter an application number to see their status and next steps, without a round of individual notification emails.
What doesn’t work well:
- No unique ID column and no way to add one
- Data that changes in real time (inventory levels, live scores) — the lookup page reflects a snapshot, not a live feed
- Use cases where participants need to search across all records, not just their own
Privacy and security
Sequential integer IDs are guessable. If your participant IDs are 1, 2, 3… someone can iterate through them and retrieve everyone’s records one by one. Use alphanumeric IDs (REG-4H8K2P) that can’t be predicted.
Two-field lookup eliminates guessing attacks. Even with sequential IDs, requiring a second field (phone number, date of birth) makes it practically impossible to retrieve a record you don’t own. Both values must match.
Privacy Protection adds a display layer. Even if someone somehow retrieves the wrong record, sensitive fields like names and emails are partially masked — useful when participants might be looking up results in public spaces.
The page can be taken offline. Unpublish it from the dashboard when the lookup window closes. The URL stops working immediately.
The URL is not password-protected, but it’s not indexed. FormHug doesn’t add Public Query URLs to your sitemap, so they won’t appear in search engine results. That said, anyone who has the URL can attempt lookups — which is why the search key design matters.
Try it live
See the visitor experience before building your own. Open the example page and enter participant ID P001:
To create your own lookup page from an Excel file, start from the FormHug dashboard.
Frequently Asked Questions
What’s the simplest way to create a lookup page from an Excel file?
Upload your .xlsx file to FormHug, designate one column as the search key (such as a participant ID or employee number), choose which columns to display in the result, and publish. The process takes under fifteen minutes and produces a shareable URL. No code or database required.
What file formats can I import?
FormHug accepts .xls, .xlsx, and .csv files. Maximum 5 MB, 6,000 rows, and 100 columns per import.
Can my spreadsheet have merged cells?
No. Merged cells aren’t supported. Unmerge all cells in Excel before uploading (select all → Format Cells → Alignment → uncheck Merge cells).
Which column should I use as the lookup field?
Use a column where every person has a unique value — a registration ID, student ID, or employee number. Avoid using names alone (not unique) or sequential integers (guessable).
Can I hide certain columns from the result page?
Yes. Only the columns you explicitly select in Step 3 are shown. Columns you leave out are never exposed — not in the page, not in the response data.
What if my Excel data changes after I publish the page?
Re-import the updated file. The lookup page reflects the data at the time of the most recent import, not the original spreadsheet. You’ll need to re-import whenever your data changes.
How do I prevent someone from guessing another person’s ID?
Use non-sequential, alphanumeric IDs (e.g., REG-4H8K2P). For higher-security use cases, require two lookup fields — an ID plus a phone number or date of birth. Guessing both simultaneously is not practical.
Do visitors need to create an account?
No. Anyone with the URL can open the page and search immediately. No sign-up, no login, no app to install.
Is this feature available on the free plan?
No. Public Query is available on Pro and higher plans. The free plan does not include this feature.
Related
- How to Share Race Results With Participants After a 5K, 10K, or Triathlon — the same approach applied to timed events and races
- How to Share Training Course Results With Students Without a Student Portal — for bootcamps, language schools, and certification courses
- How to Create a Private Exam Results Lookup Page — for academic exams, certifications, and judged competitions
- Public Query — the FormHug product page for turning form or Excel data into searchable lookup pages
Every spreadsheet you share directly asks people to ignore rows they should not see. A lookup page removes that trust problem and gives each person only their own record. Create your lookup page →

Written by
FormHug TeamProduct, research, and form automation team
The FormHug Team brings together product builders, workflow researchers, and form automation practitioners who study how people collect, route, and act on information online. Our guides are based on hands-on product testing, template analysis, customer workflow patterns, and deep experience with forms, surveys, quizzes, AI-assisted creation, integrations, and results sharing.