Payment Form for Freelancers: Collect Project Details and Deposits in One Step
Freelancers rarely just need to “get paid.” A designer needs the brand files. A consultant needs the project context. A coach needs the session goal. A photographer needs the date, location, usage rights, and deposit agreement. The payment matters, but the details around the payment are what make the work possible.
That is why the usual payment options can feel slightly wrong. Shopify is built for stores. Gumroad and creator support tools are useful when you sell digital products, memberships, or audience-backed work. A Stripe payment link is fast, but it can leave the brief, files, invoice notes, and terms scattered across email.
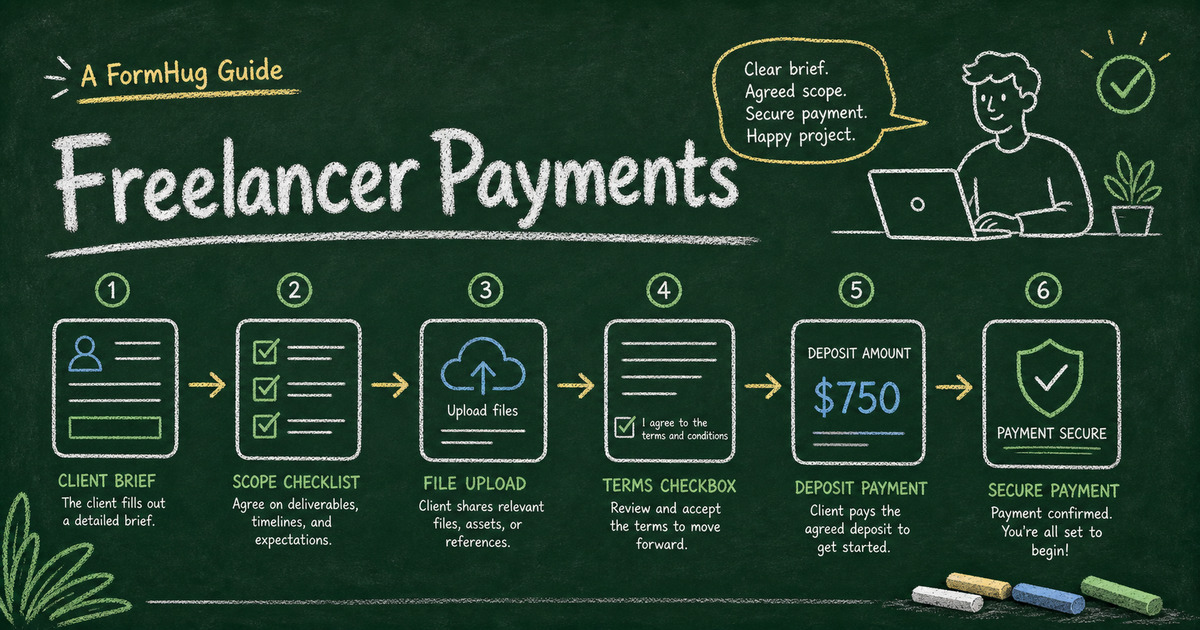
A payment form gives freelancers a middle path: collect project details, confirm terms, and take a Stripe payment in one submission. This article explains when a payment form is the right fit, what to ask clients before they pay, and how to build a freelancer payment workflow in FormHug.
TL;DR - A freelancer payment form combines client intake, scope details, files, terms, deposit amount, and Stripe payment in one record.
- Use a form when payment needs context - project scope, deliverables, timelines, files, client notes, and policy acceptance.
- Use a payment link when the amount is enough - a simple invoice, one agreed fee, or a repeat client who already sent the details.
- Use a creator platform when discovery matters - marketplaces and audience tools can help when the platform brings buyers.
- Works for: designers, writers, consultants, coaches, photographers, tutors, marketers, agencies, and independent service providers.
- FormHug charges 0% platform fees on paid plans; Stripe processing fees still apply.
Why Freelancers Need More Than a Payment Link
A payment link solves one problem: the client can pay. It does not always solve the freelancer’s operational problem: what exactly did the client pay for?
For a simple repeat payment, that is fine. For a new project, the payment usually belongs next to the intake:
- What service or package did the client choose?
- What deadline or session date are they asking for?
- What files, links, or references do they need to upload?
- What invoice name or billing details should you use?
- What policy, cancellation rule, or project term did they accept?
- Is this a deposit, full payment, rush fee, add-on, or balance payment?
If those answers live in email while the payment lives in Stripe, the project record starts fragmented. A form keeps the brief and payment together from the first step.
For the broader pattern, see Stripe form builder: accept payments without a store. If your freelance workflow starts with qualification instead of payment, the online application form guide shows how to collect review-ready details before accepting a project.
Freelancer Payment Form vs Store vs Creator Platform
The right tool depends on what the client is doing.
| Tool | Best for | Freelancer tradeoff |
|---|---|---|
| Stripe payment link | Simple one-off payment | Intake details live elsewhere |
| Shopify | Product catalog or full storefront | Too heavy for most service workflows |
| Gumroad-style product page | Digital products, downloads, audience selling | Higher platform fees can make service deposits expensive |
| Buy Me a Coffee-style support page | Tips, support, memberships, creator audience | Not ideal for detailed project intake |
| FormHug payment form | Service payment plus client details | Not a marketplace or storefront |
The practical question is: does the platform bring you buyers, or are you bringing the client yourself?
If a marketplace or creator platform helps with discovery, audience, memberships, affiliates, or digital delivery, its fee may be worth it. If the client already decided to hire you, the platform’s job is smaller. You need a clean handoff from “yes, let’s start” to “paid project record with all the details.”
That is where a form + Stripe setup is often more natural for freelancers. You keep the client experience lightweight, avoid building a store, and still collect the custom information that a bare checkout page misses.
Match the Form to the Project State
Freelancer payments happen at different moments. A good form makes that moment explicit so the client knows what they are confirming and you know what to do next.
| Project state | What the form should collect |
|---|---|
| Paid consultation | client goal, topic, preferred time, payment |
| Project deposit | scope summary, timeline, files, terms, deposit |
| Rush fee | original project link, rush deadline, extra fee |
| Retainer kickoff | services included, billing details, start date, first payment |
| Final balance | project reference, approval note, remaining amount |
This project-state lens prevents the form from becoming a generic intake questionnaire. A deposit form should not ask the same questions as a final balance form. A rush-fee form should not ask the client to re-explain the whole project if you already have the brief.
For a new client, include contact details, company or website, service selection, project brief, timeline, files or links, billing details, terms, and Stripe payment. For an existing client, cut the form down to the project reference, amount, and any details that changed.
Choose the Payment Field by Client Decision
The payment field should match what the client is deciding at that moment:
| Client decision | Best payment field | Example |
|---|---|---|
| ”I need to pay the agreed amount.” | Price-Only | deposit, consultation fee, final balance |
| ”I need to choose a package.” | Text Product | brand audit, copy package, photo session |
| ”I need to choose a combination.” | Text Option | rush vs standard plus license type |
| ”I need to buy a physical add-on.” | Product | printed deliverables, merch, sample kit |
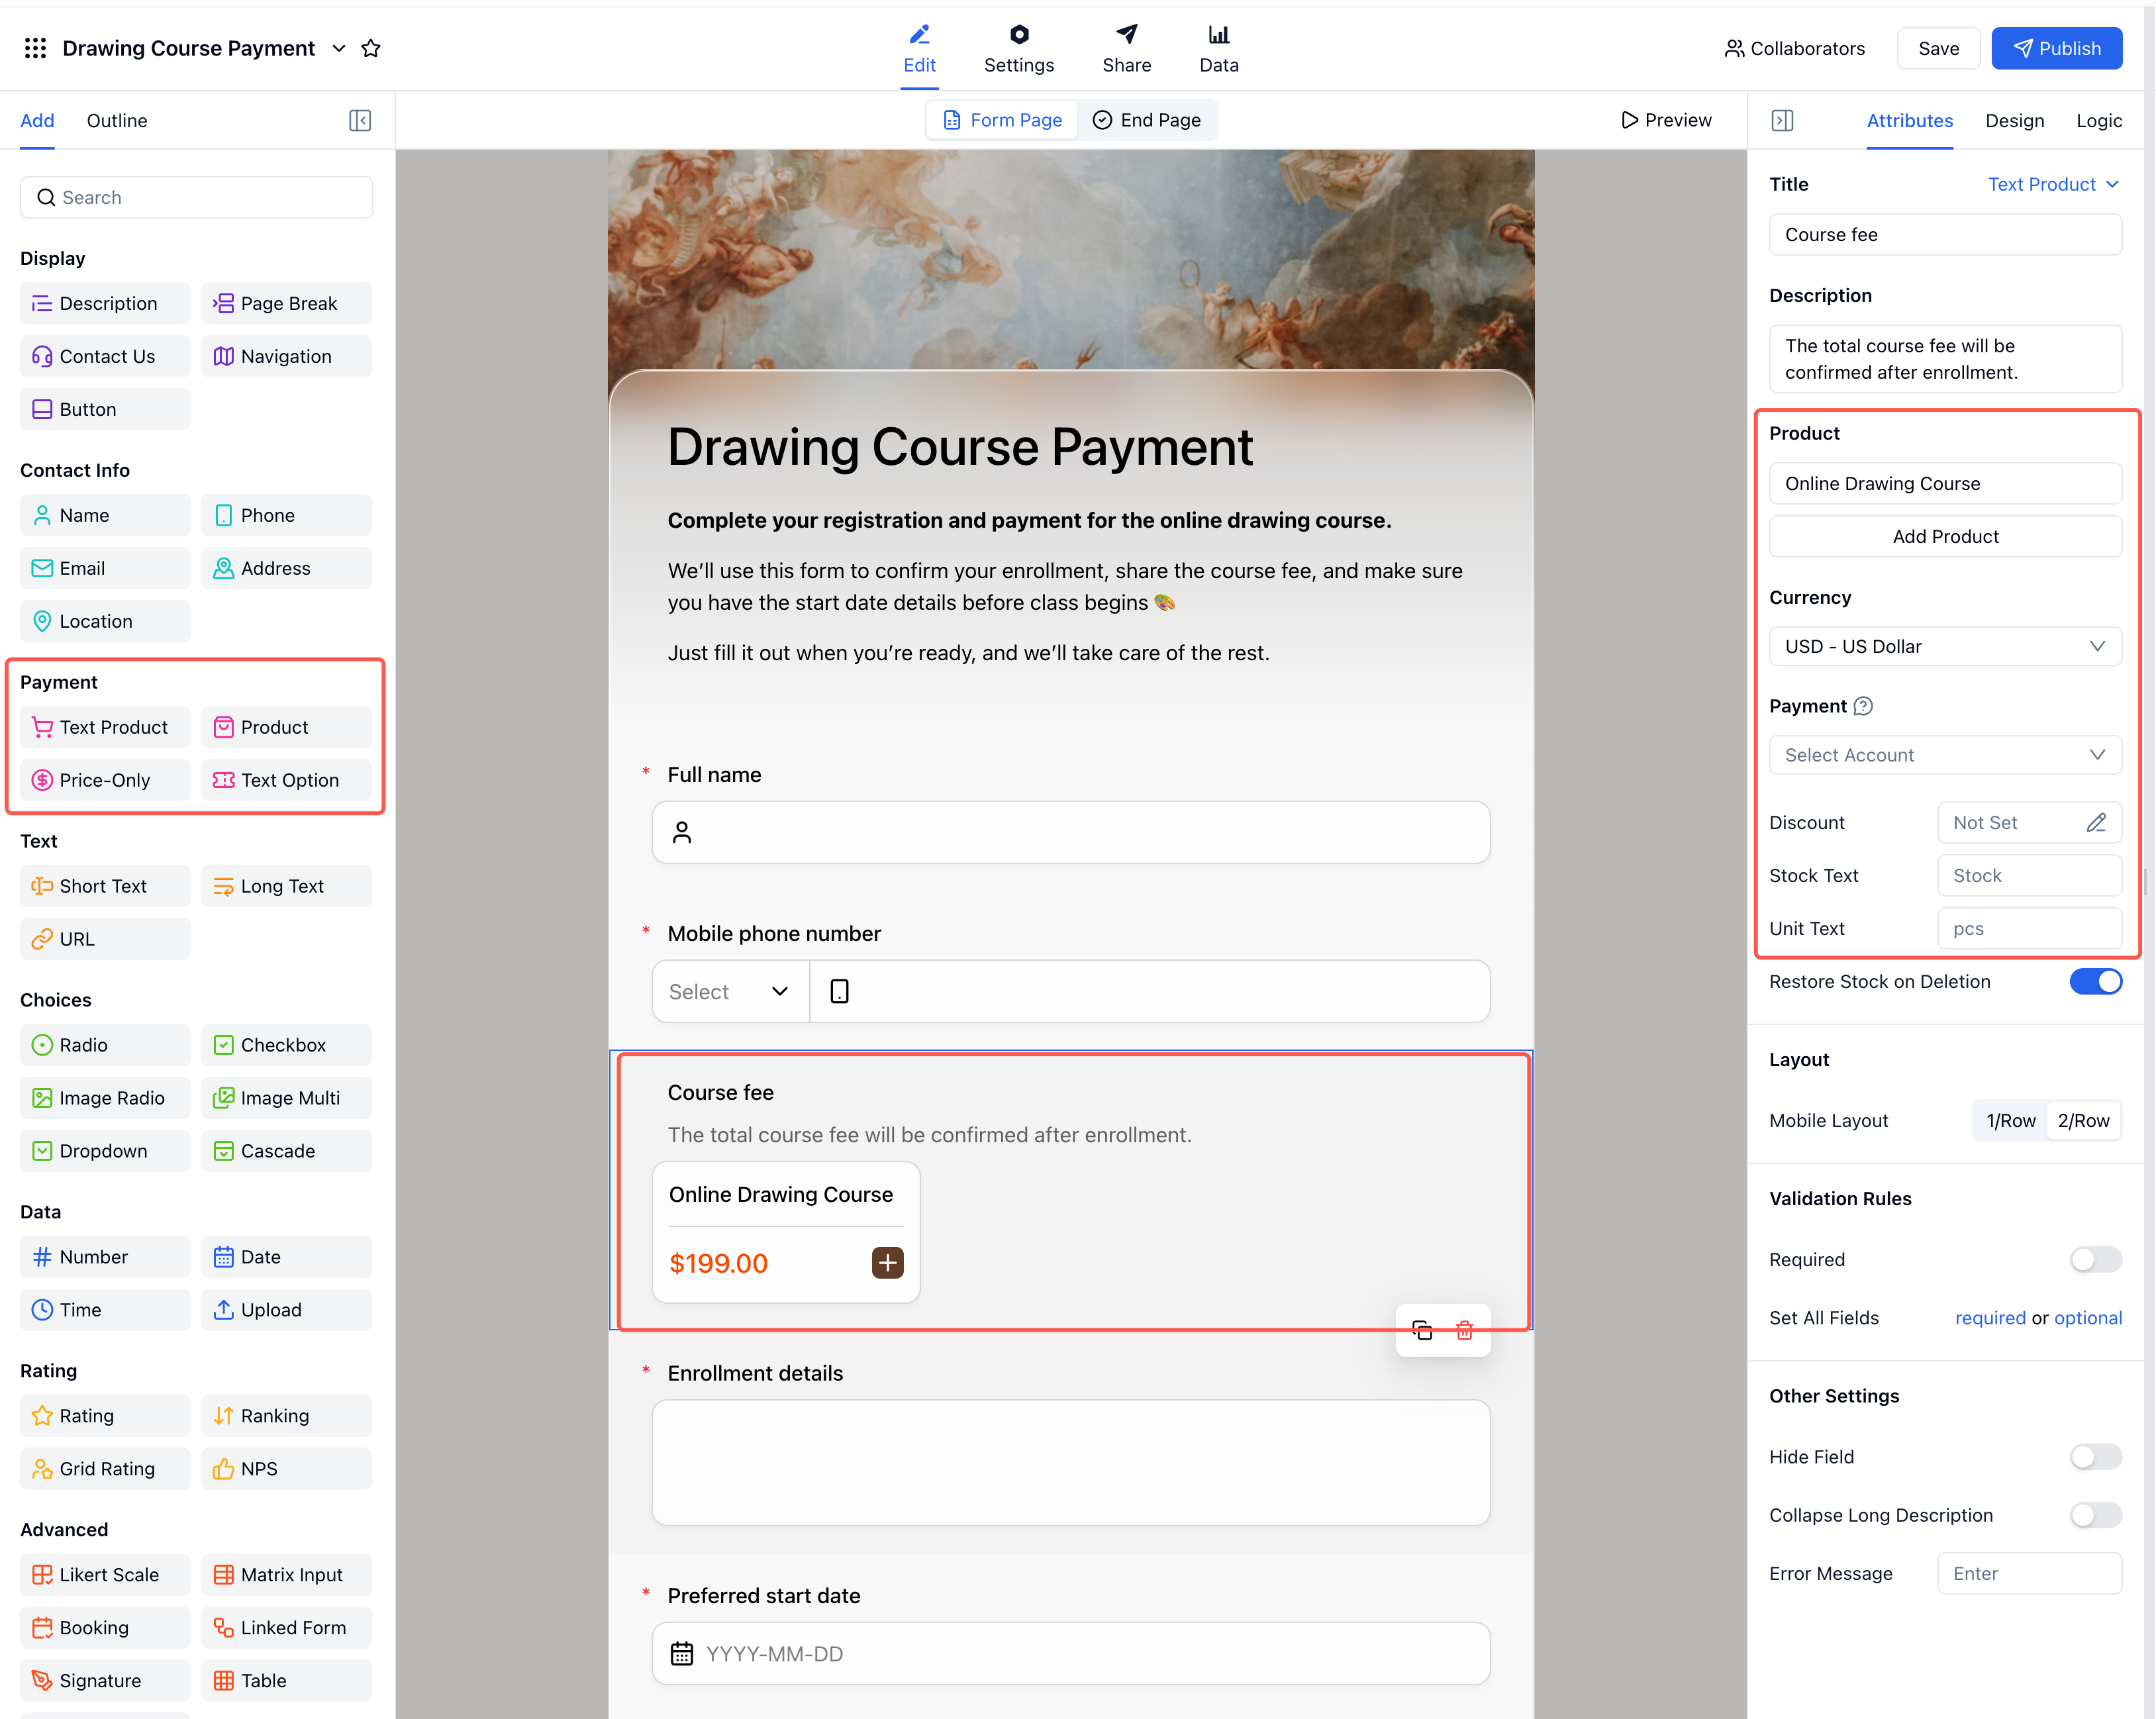
The field choice should match the buying decision. If the client is not browsing products, do not make the payment feel like a store. If the client is choosing a package, make the options explicit before checkout.
Templates to Start From
These templates are useful starting points for freelancer payment workflows:
- Payment Form Template - for deposits, balances, consultations, and agreed fees.
- Service Order Form Template - for service packages, add-ons, and project intake.
- Order Form Template - for structured service or product orders.
- Invoice Request Form Template - for collecting billing details before sending an invoice.
Start simple. If the form is for an existing client, ask only for the payment and the minimum details needed to match the project. If the form is for a new client, include enough intake questions to make the first paid step usable.
How to Build a Freelancer Payment Form in FormHug
Step 1: Name the paid milestone
Write one sentence before building: “This payment confirms ___.” It might confirm a consultation, a project deposit, a retainer start, a rush fee, or a balance payment. That sentence keeps the form focused.
Step 2: Ask only for missing context
Add fields for service, timeline, brief, links, files, and billing details only when you do not already have them. Existing clients should not feel like they are starting from zero.
Step 3: Put terms next to the money
Put cancellation, refund, revision, scope, or balance terms before the payment step. Use a required checkbox when acceptance matters.
Step 4: Add the field that matches the milestone
Use Price-Only for fixed deposits, Text Product for packages, or Text Option for priced combinations. Submit a test response and confirm the payment status appears with the project details.
Step 5: Send the right confirmation
The confirmation should tell the client what happened and what comes next: “Your deposit and project brief were received. I will review the details and email the kickoff timeline within one business day.”
Frequently Asked Questions
What is a freelancer payment form?
A freelancer payment form is an online form that collects client details, project scope, terms, and Stripe payment in one workflow. It is useful for deposits, consultations, service packages, and project kickoff payments.
Is a payment form better than a Stripe payment link?
Use a Stripe payment link when the client only needs to pay. Use a payment form when you also need project details, files, deadlines, billing notes, terms, or package choices attached to the payment.
Should freelancers use Shopify?
Shopify is useful when you run a storefront or sell a catalog of products. Most freelance service payments do not need a store. A payment form is lighter when the main job is collecting a brief and deposit.
Are creator platforms better for freelancers?
Creator platforms can be helpful when they bring an audience, marketplace discovery, memberships, or digital delivery. If the client already found you, a direct form + Stripe workflow can be simpler and more flexible.
Can I collect a project deposit through a form?
Yes. Add the project intake questions, state the deposit and balance terms, include a required acknowledgement checkbox, and use a Price-Only payment field for the deposit amount.
Can FormHug create a freelancer payment form?
Yes. FormHug AI can draft the client intake form, and you can add payment fields, file uploads, terms, Stripe checkout, and confirmation messages before publishing.
Related
- Stripe Form Builder: How to Accept Payments Without a Store or Checkout Page - understand the broader form + Stripe payment workflow
- How to Collect a Deposit When Someone Books an Appointment - apply the same deposit logic to bookings and appointments
- How to Create an Online Application Form - collect review-ready project details before accepting work
- How to Send Emails to Form Submitters - send the right receipt, kickoff note, or next-step email
The best payment flow for a freelancer is not always the most complex one. When the client is ready, collect the brief, terms, and payment in the same place so the project starts clean. Create your form →

Written by
FormHug TeamProduct, research, and form automation team
The FormHug Team brings together product builders, workflow researchers, and form automation practitioners who study how people collect, route, and act on information online. Our guides are based on hands-on product testing, template analysis, customer workflow patterns, and deep experience with forms, surveys, quizzes, AI-assisted creation, integrations, and results sharing.