Stripe Form Builder: How to Accept Payments Without a Store or Checkout Page
Build the paid workflow
Collect payment with the form
Turn the registration, order, booking, or donation flow into a payment-ready FormHug form.
Shopify can be too much when you are not trying to run a full online store. A bare Stripe payment link can be too little when you need more than a dollar amount. Most small payment workflows live in the middle: someone is ordering a T-shirt, registering for a workshop, paying a deposit, booking a package, donating to a campaign, or confirming a service. You need the payment, but you also need the details that make the payment useful.
That is where a Stripe form builder makes sense. It combines a form, product or price fields, an order summary, and Stripe payment into one submission. The customer chooses what they want, answers the questions you need for fulfillment, and pays before the record is created.
This article explains why form-based payment works, when it is better than a payment link or a store, which FormHug payment field fits each use case, and how to build a payment form that behaves like a lightweight order and payment system.
TL;DR — A Stripe form builder lets you collect order details and payment in one workflow, so you do not need a full store when the form context matters.
- Use a payment form when the payment needs context - sizes, quantities, dates, ticket tiers, donor messages, booking notes, intake answers, or consent.
- Use a payment link when the amount is the whole story - a simple one-time charge, a product link, or a donation with minimal extra data.
- Use Shopify when you need a store - product pages, catalog browsing, shipping workflows, inventory operations, and repeat shopping.
- FormHug sits between the two - product fields, order summaries, custom questions, submissions, and Stripe payment in one form.
- Works for: merch sales, workshop registration, freelancer deposits, food pre-orders, event tickets, donations, and service packages.
What Is a Stripe Form Builder?
A Stripe form builder is a form tool that lets you collect custom information and Stripe payment in the same flow. Instead of sending someone to a separate checkout page and then asking for details somewhere else, the form itself contains the product choices, pricing logic, order summary, and questions required to fulfill the order.
A payment form is different from a plain checkout link because the form data matters as much as the payment. If someone buys a workshop ticket, you may need their session choice, dietary restrictions, attendee name, company, consent, and reminder preferences. If someone buys a shirt, you need size, color, quantity, shipping notes, and maybe personalization. If a client pays a deposit, you need the project context attached to the payment.
Any FormHug form can become a payment form when you add a payment field and connect Stripe. The online booking form for your photography sessions, the registration form for your workshop, or the client intake form for a freelancer project can start collecting payment without being rebuilt as a store. For a product-level overview, see FormHug’s payment form builder.
Why Use a Form Builder for Payment?
Use a form builder for payment when the money is only one part of the workflow.
A payment link is excellent when the checkout is the whole job. Stripe Payment Links are designed for shareable, Stripe-hosted checkout pages and can collect standard details such as addresses, phone numbers, names, tax IDs, terms acceptance, and custom fields. That is useful for simple selling. But it is not the same as a full form workflow with sections, conditional questions, file uploads, consent fields, page breaks, business-specific labels, and reusable submission records.
A store is excellent when customers need to browse a catalog. Shopify’s own store setup flow includes work such as adding products, collections, pages, menus, policies, domains, payment settings, shipping, taxes, and launch preparation. That is the right infrastructure when the store is the business. It can be overbuilt when you only need to sell one workshop, collect deposits for appointments, run a merch drop, or take a few prepaid orders.
A payment form is the middle path. It gives you enough structure to act like a lightweight order and payment system without asking you to build a full storefront. The customer gets one clean flow. You get one record with the order details and payment status together.
How FormHug Compares for Payment Forms
| Tool | Best for | Where it gets awkward |
|---|---|---|
| FormHug payment forms | Orders that need both payment and custom information | Not a full store with shipping labels, fulfillment operations, or complex inventory management |
| Stripe Payment Links | A fast hosted checkout link for a product, donation, subscription, or simple payment | Custom information is limited compared with a real form workflow |
| Shopify or full e-commerce stores | Catalogs, product pages, shipping, inventory, discounts, and repeat store browsing | Heavy setup when you only need one paid form or a small campaign |
The practical difference is workflow fit. If the customer needs to browse and shop, build a store. If the customer only needs to pay, send a payment link. If the customer needs to choose, answer, consent, upload, schedule, or explain before paying, use a payment form.
Any Form Can Collect Payment
FormHug has payment fields built for selling: product cards, package options, flexible amount fields, order summaries, and Stripe payment. But the more useful thing to know is this: payment is a field. A payment field can sit inside the form you are already building. Your registration form, booking form, intake form, donation form, or survey can collect Stripe payment without being rebuilt as a store.
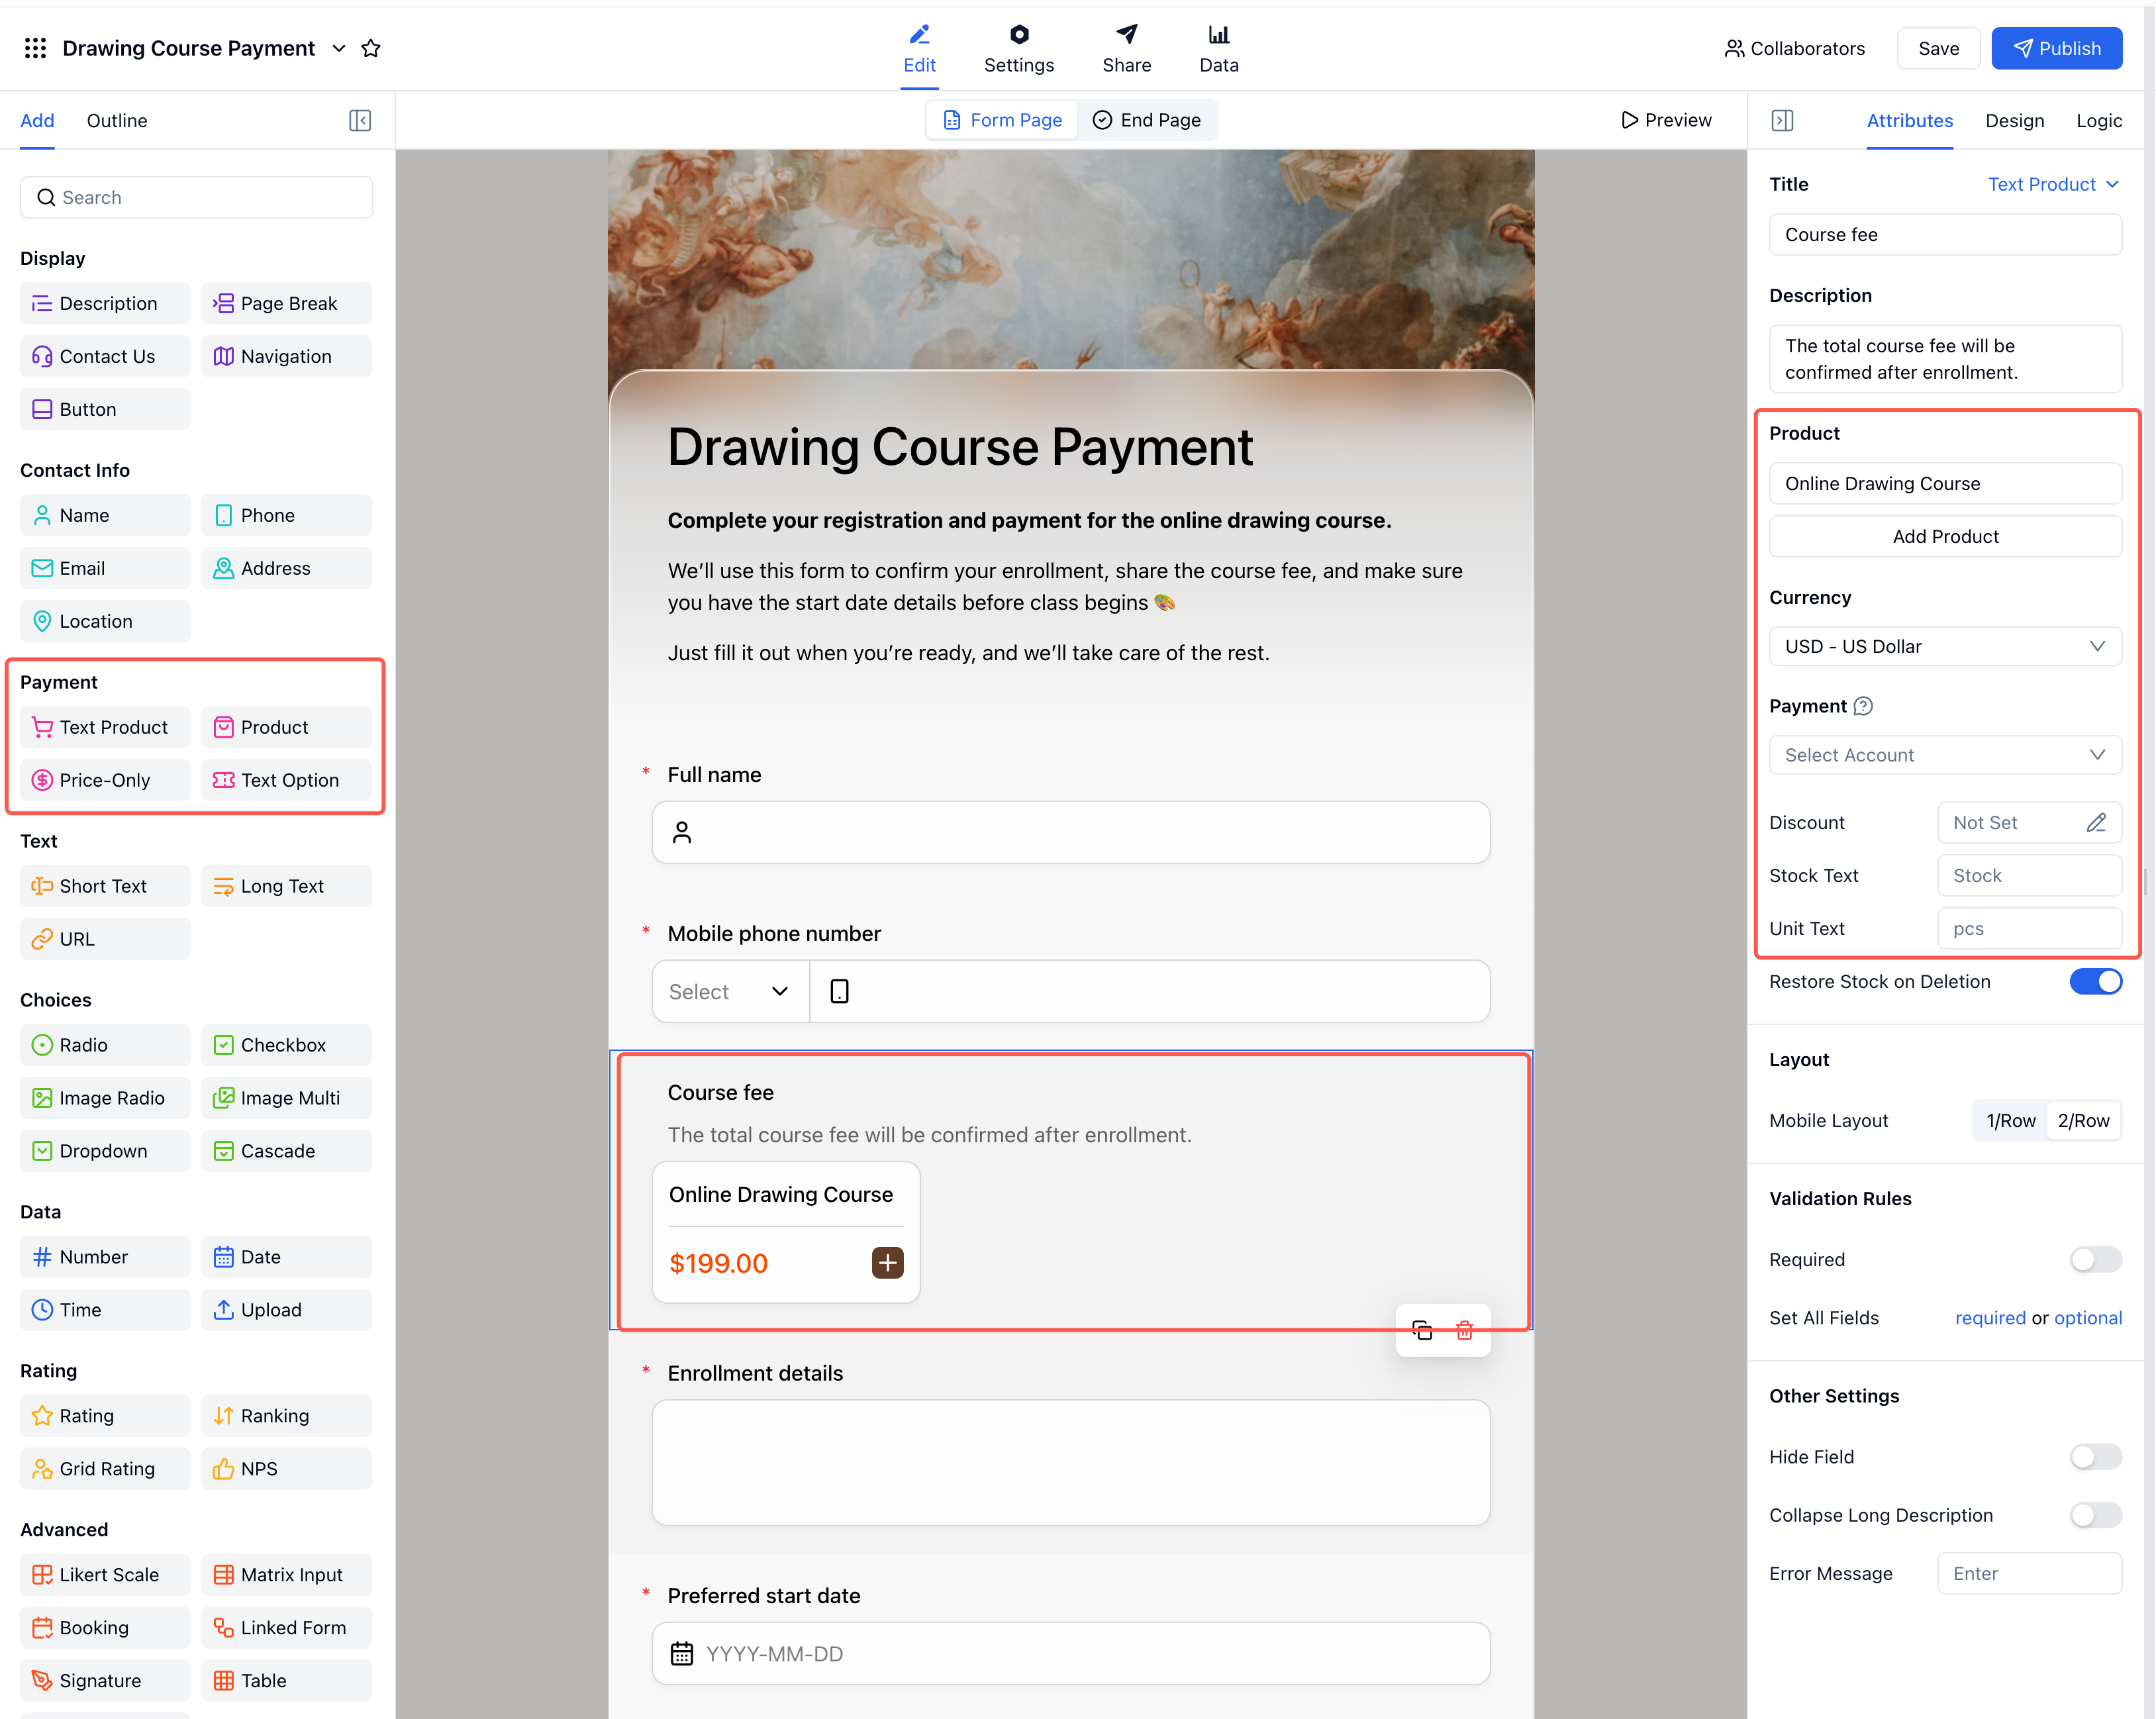 The four payment field types appear in the editor panel alongside all other field types. Add any of them to any form.
When you add a payment field, Stripe checkout activates at form submission. The customer pays before the submission goes through. You get a FormHug submission with the full form data plus a payment status field, and your Stripe dashboard gets the payment record.
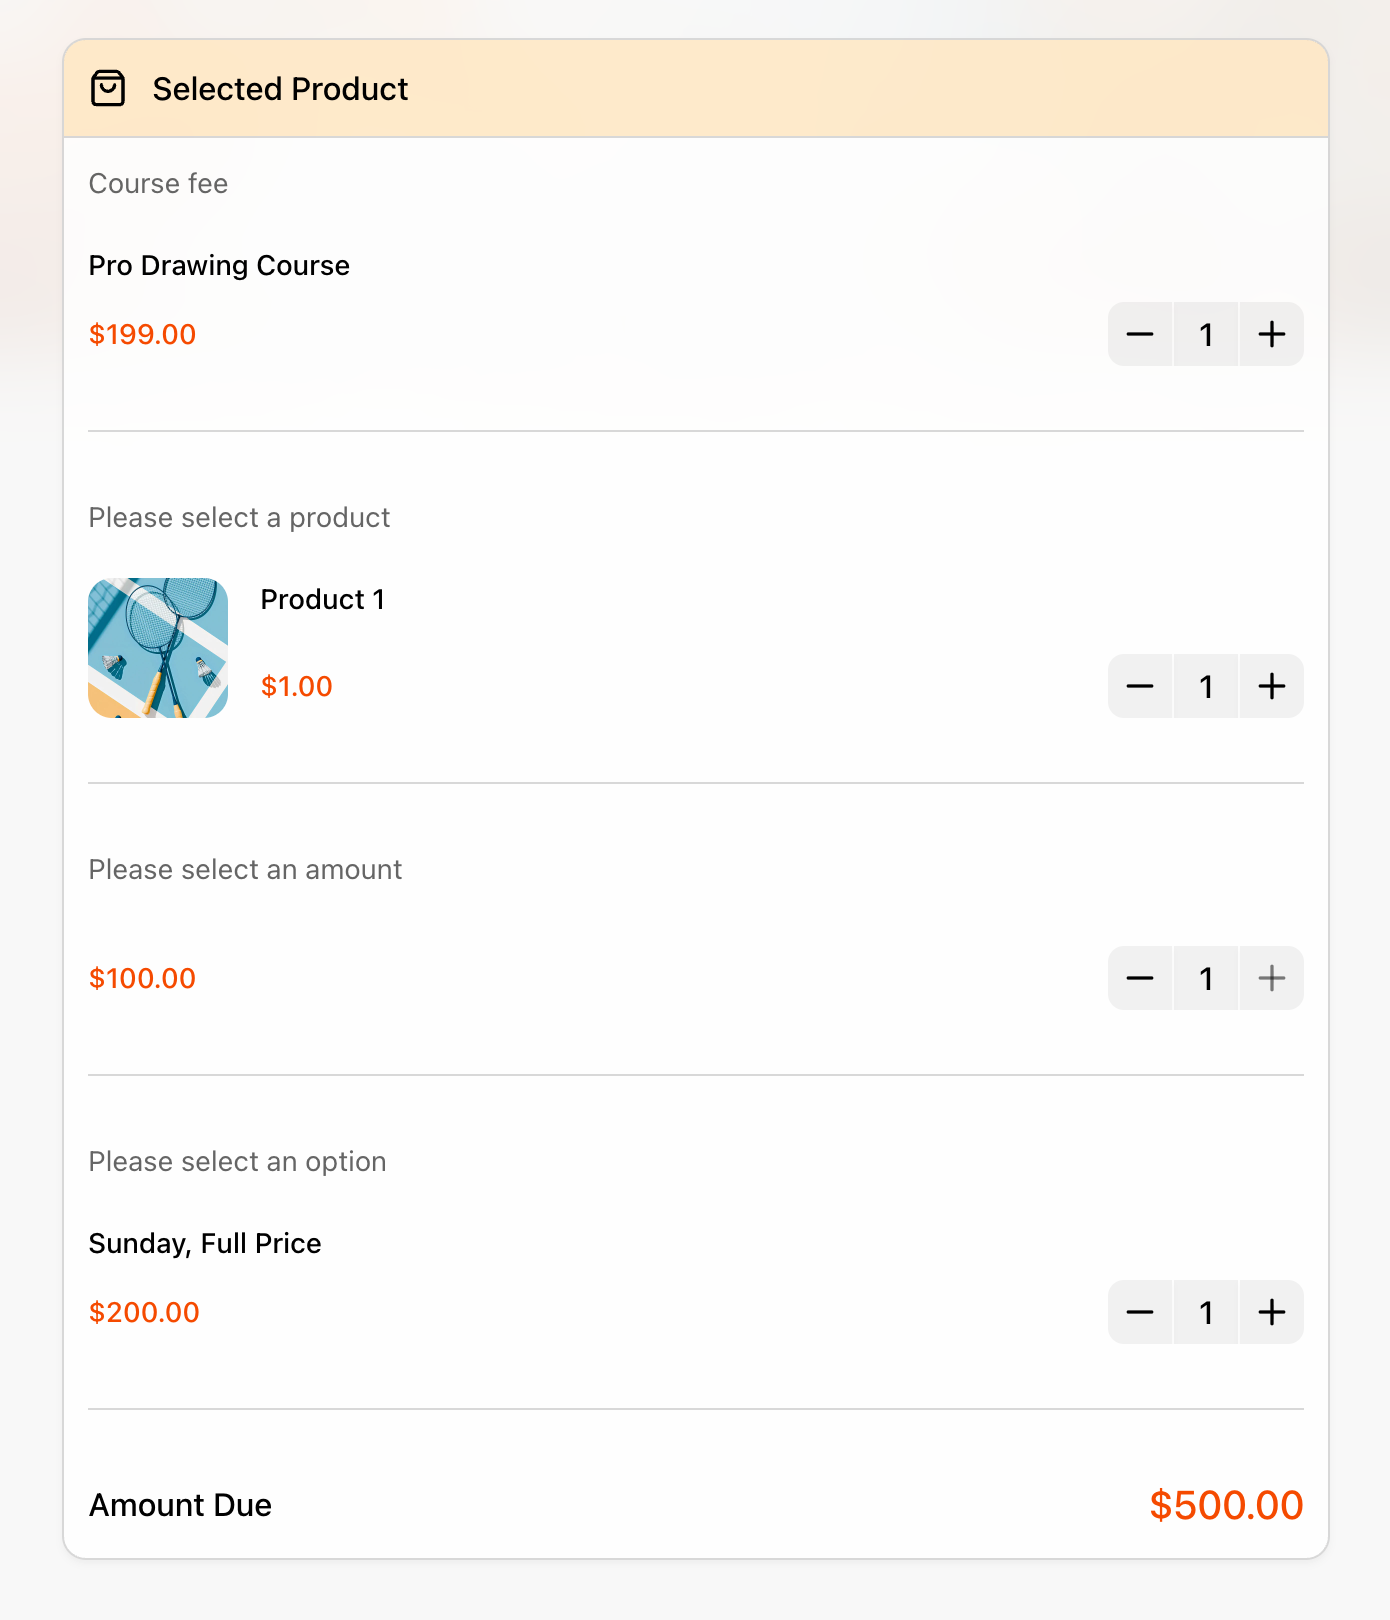 The order summary updates in real time as customers add items across product fields. Amount Due is visible before they pay.
Card data is handled by Stripe checkout, not stored in FormHug form records. On paid plans, FormHug charges zero platform fees, so you pay Stripe’s processing fee directly. Check Stripe’s current pricing for your country and payment method before publishing a paid workflow.
Payment Form Field Types
Once you add a payment field to your form, there are four types to choose from depending on what you’re selling.
Product
Use Product when people need to compare visual goods. It is the closest fit for merchandise, food items, small catalogs, product bundles, branded goods, and physical items where the image helps the buyer decide.
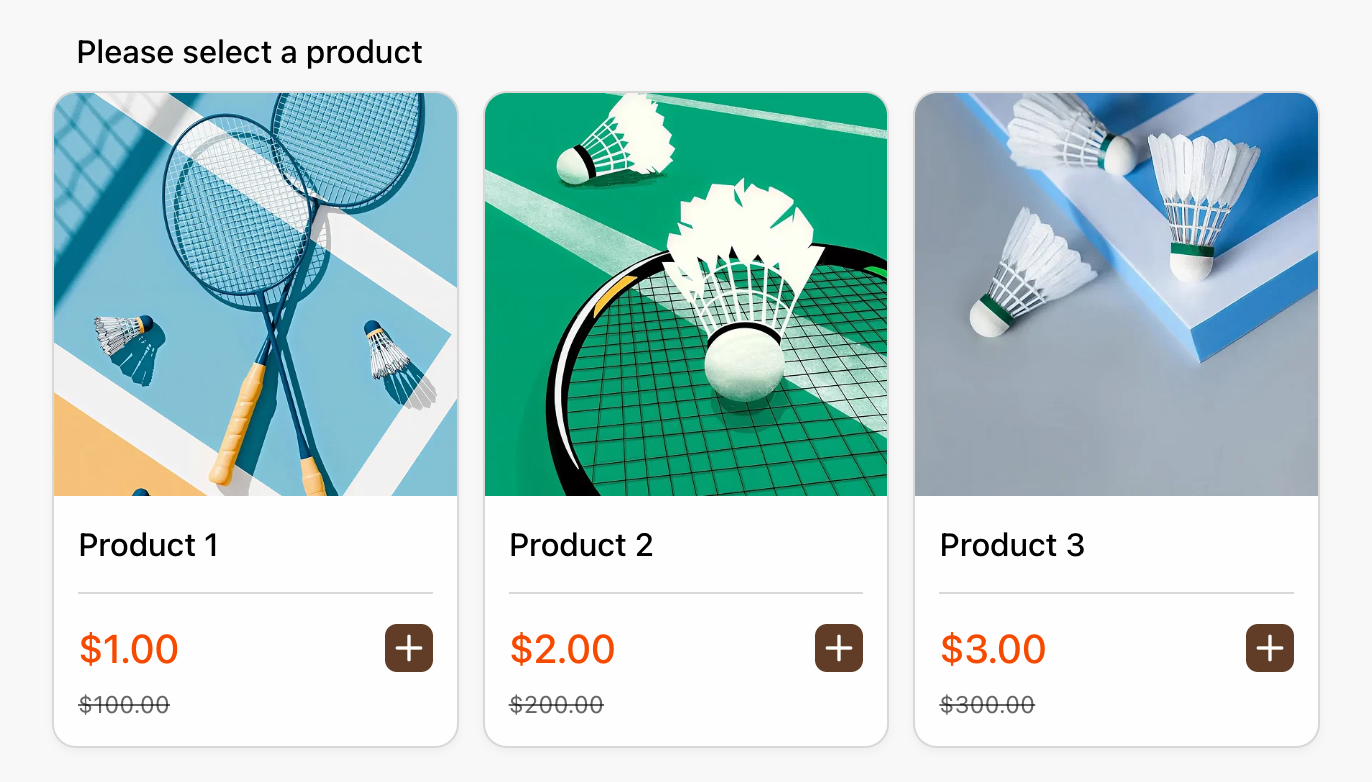 Product field: image cards with photo, name, current price, and optional sale price. Customers add items with the + button.
When to use this: Selling T-shirts, tote bags, stickers, food boxes, event merch, printed materials, or product bundles. Product fields can support images, descriptions, variants, quantities, stock, and discounts.
Text Product
Use Text Product when the offer is a package, service, room, workshop, or course tier that is easier to compare by name and description than by image.
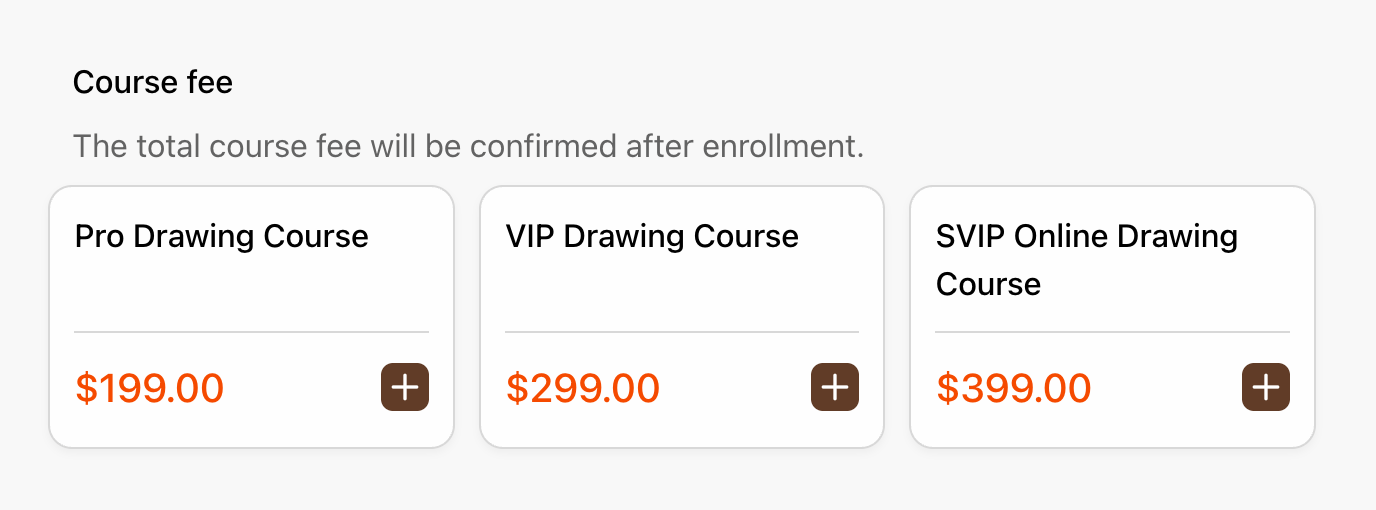 Text Product field: service or course tiers as clean text cards. The name and price are the whole pitch.
When to use this: Hotel packages, service packages, consulting tiers, workshop passes, course packages, appointments with fixed packages, or digital offers where text carries the buying decision.
Price-Only
Use Price-Only when the amount is the product. You can offer preset amounts, allow a custom amount, set a fixed amount, or collect a simple fee.
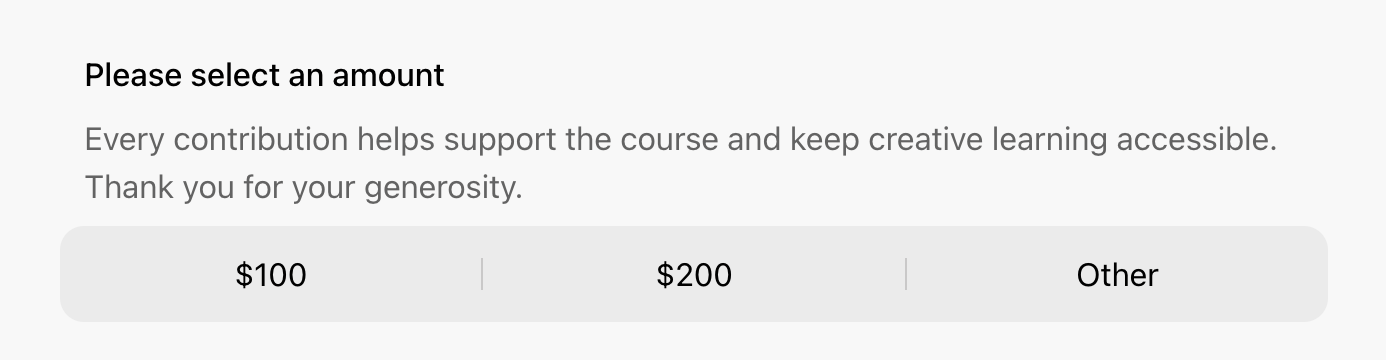 Price-Only field: preset amounts plus a custom “Other” option. Add a description to give context — ideal for donations or variable deposits.
When to use this: Donations, deposits, registration fees, service charges, pay-what-you-want payments, simple sponsorship amounts, or any workflow where the form already explains what the money is for.
Text Option
Use Text Option when the final price comes from text choices, such as ticket type plus attendance option. The buyer is choosing one paid variant combination rather than browsing a product catalog.
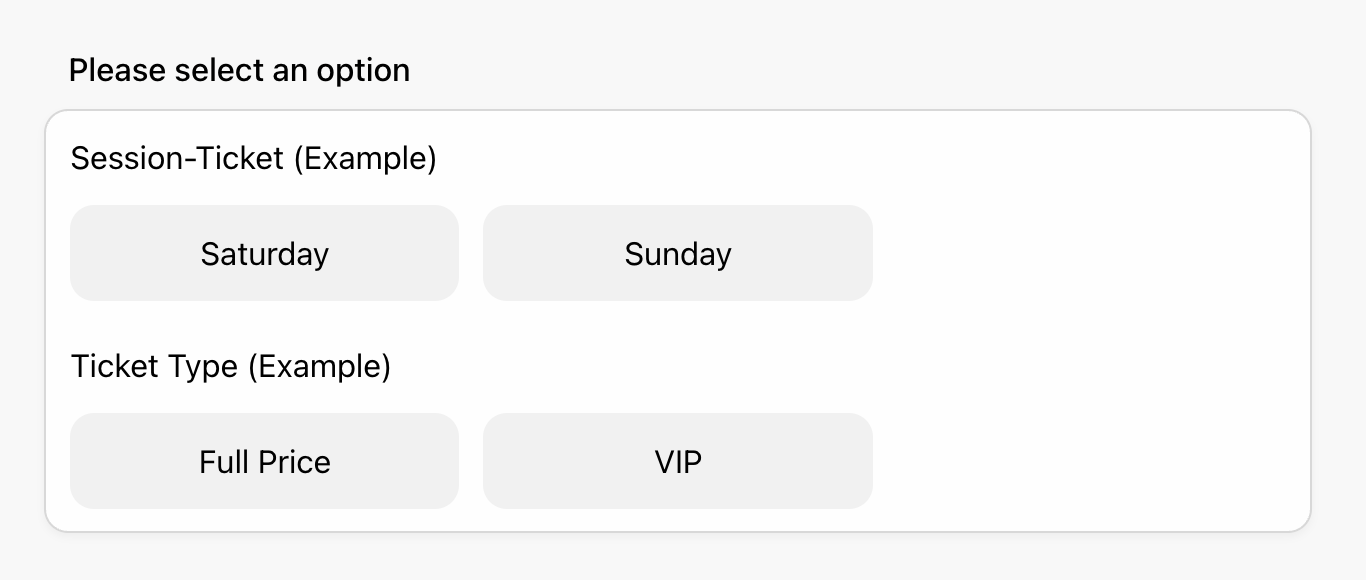 Text Option field: named choices, each with its own price. Multiple option groups can sit inside the same field.
When to use this: Event ticket forms, workshop registration, membership plans, course packages, consultation packages, access levels, or any paid option set where the label matters more than an image.
Ready-Made Payment Form Templates
FormHug has ready-made online order form and payment form templates you can start from instead of building from scratch. Here are a few from the orders & payments template collection; for a broader list by use case, see 13 free order form templates with online payment.
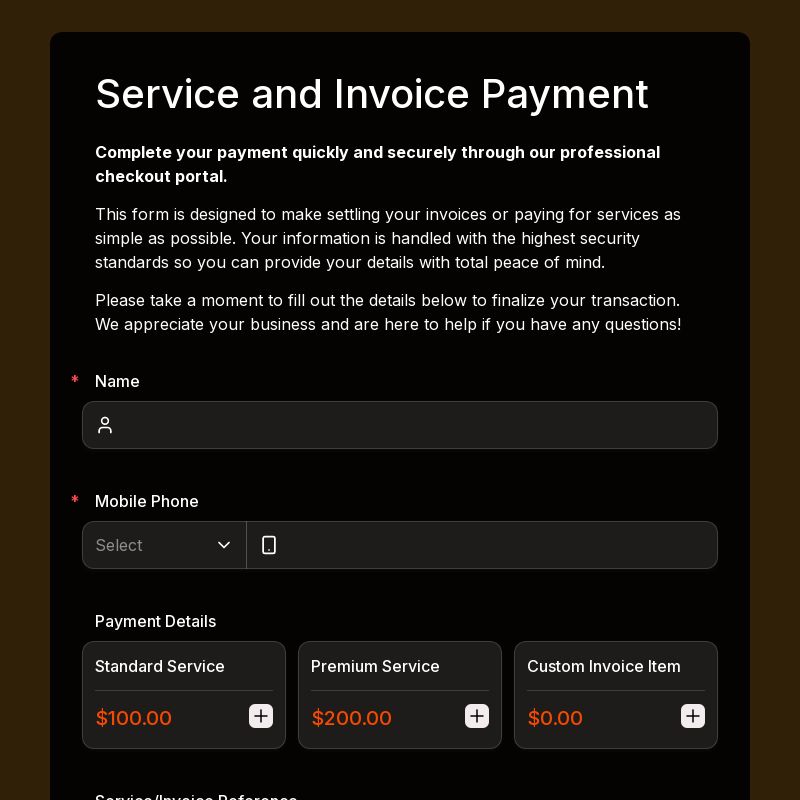
Payment Form Template — Built for freelancers and small businesses. Captures payment amounts, reference numbers, and billing details with Stripe integration. Closes the gap between sending an invoice and actually getting paid.

Service Order Form Template — Combines service selection, scheduling, and payment into one submission. Appointment-based businesses (salons, tutors, photographers, cleaning services) collect the booking and the payment in the same step — no follow-up invoice.

Food Order Form Template — For restaurants and caterers. Customers specify menu items, customizations, dietary requirements, and pickup time without a phone call. Works for scheduled pre-orders and catering events.

T-Shirt Order Form Template — For merch drops and branded events. Handles size, color, quantity per person, and payment in one form — no e-commerce product page needed.
The pattern is the same across all of them: take a form you’d need anyway, add the right payment field, connect Stripe. The form collects the data and the money in one step. For intake forms that also collect a project deposit, see how to create an intake form.
How to Create a Stripe Payment Form
Step 1: Start from the form your customer already needs
Start with the information you need before the customer pays: registration details, booking preferences, order customizations, donation notes, or client intake answers. In FormHug, open an existing form or create a new one around that workflow.
If you’re starting from scratch, describe what you’re selling to FormHug’s AI builder: “workshop registration with three session options, early bird pricing available.” The form structure, field choices, and payment field can be generated from that prompt.
Step 2: Choose the payment field that matches the pricing model
Add the payment field type that fits what you’re charging for:
- Product — items with photos and quantities
- Text Product — items without photos, text descriptions only
- Price-Only — single amount, preset options, or flexible input
- Text Option — named choices with different prices
You can add more than one payment field to the same form, such as a Text Option field for ticket tier plus a Price-Only field for an optional donation.
For exact field behavior and setup options, the payment fields documentation covers Product, Text Product, Price-Only, Text Option, discounts, currency, and related payment settings.
Step 3: Make the price visible before checkout
For each item, set the name, price, quantity rules, and option labels. The key conversion principle is simple: customers should understand the total before they hit submit. As they fill out the form and make selections, a Selected Product panel appears on the page showing each chosen item and a live Amount Due total.
Step 4: Connect Stripe, test the payment, then publish
Connect your Stripe account, select the currency, and run a test payment before sharing the form. Confirm the total calculates correctly and the receipt email arrives. Then distribute the form: share the link directly by email, embed the payment form on any webpage, or post it in a messaging group or social bio.
What you get after every payment
Two records are created automatically when a customer submits and pays:
In Stripe: a payment entry with the amount, customer email, and automatic receipt. No action needed on your side.
In FormHug: a submission with the complete form data — all fields, selections, quantities — plus a Payment Status field. You can view submissions in the dashboard, export to CSV, or forward to a webhook for Airtable, a CRM, or an email notification.
Failed payments are recorded too (Payment Status: Failed) so you have a complete log. You can follow up manually or resend the form link.
One clarification: FormHug is not a full order management system. It doesn’t handle inventory, shipping labels, or fulfillment. What it does is get the right information and the payment into your hands immediately, in one place — the coordination problem that makes running a service business or small event painful goes away.
Frequently Asked Questions
Is there a free payment form builder?
FormHug’s free plan lets you build forms and test the product, but collecting live Stripe payments requires a paid plan. Once on a paid plan, there are no per-transaction platform fees from FormHug — you pay only Stripe’s standard rate. For low-volume use cases (small events, occasional client deposits), the cost of the plan is typically a fraction of what a dedicated payment platform would charge.
Can I embed a payment form on my website?
Yes. Every FormHug form has an embed code you can paste into any webpage — a static site, Webflow, WordPress, Squarespace, or a custom HTML page. The embedded payment form works identically to the standalone link: Stripe checkout activates on submission, receipts go out automatically, and submissions appear in your FormHug dashboard.
Can I add payment to a form I’ve already built?
Yes. Open the existing form in FormHug, add a payment field from the field panel, and connect Stripe in Form Settings. The form does not need to be rebuilt. Existing fields, logic, and settings are preserved.
Do customers get a receipt automatically?
Yes. Stripe sends an automatic receipt email to the customer after a successful payment. You don’t need to set this up — it’s part of Stripe’s default behavior. The email includes the amount paid, a transaction ID, and your Stripe business name.
What payment methods are accepted?
Payment methods are handled through Stripe Checkout and depend on your Stripe settings, country, currency, and payment method availability. For most simple payment forms, card payment is the baseline; additional payment methods depend on your Stripe configuration.
Can I charge for just part of the total — like a deposit?
Yes. Use a Price-Only field and set it to the deposit amount. Alternatively, describe the deposit context in the form (e.g., “50% deposit to confirm booking — remainder due on the day”) and set the Price-Only field to the deposit figure. The form collects the deposit; you handle the balance separately.
Does FormHug take a cut of each transaction?
No, on the Pro plan. FormHug charges zero platform fees. You pay Stripe’s processing fees directly. Check Stripe’s current pricing for your country, currency, and payment method before publishing a paid form.
Can I use different currencies?
Yes. Currency is set per form in Form Settings → Payment. All currencies supported by Stripe are available. If you run events or sell to customers in multiple countries, each form can be configured for a different currency.
How do I get started?
FormHug payment forms are available on paid plans. Connect your Stripe account in workspace settings, add a payment field to any form, test the order summary and payment flow, then publish. Start here.
Related
- How to Create an Online Booking Form for Appointments, Classes, and Reservations — add a deposit field to your booking form to collect payment at the time of reservation
- How to Create an Intake Form That Collects the Right Information — combine client intake with a kickoff deposit in one form
- How to Create an RSVP Form — RSVP collection with optional ticket payment for events
Every separate invoice is another chance for a customer to delay, forget, or ask you to resend the link. Put the form details and the payment in one flow instead. Create your form →

Written by
FormHug TeamProduct, research, and form automation team
The FormHug Team brings together product builders, workflow researchers, and form automation practitioners who study how people collect, route, and act on information online. Our guides are based on hands-on product testing, template analysis, customer workflow patterns, and deep experience with forms, surveys, quizzes, AI-assisted creation, integrations, and results sharing.